Saturday 27 September 2014

Singhara ata poori |How to make singhade ki puri | Navratri special


Water caltrop, water chestnut or Singhara (Trapa bispinosa Roxb.) is very nutritional and beneficial for health. Singhara is a fruits so in Vrat or fasting its flour is used for preparing dishes


Singhare ke atte ki puri is made during religious fasting days like shivratri ,janmashtami, ekadashi fast or navratri fasting.

During fasting days in india, only certain flours are used. e.g. singhare ka atta (water chestnut flour), kuttu ka atta (buckwheat flour), rajgira ka atta (amaranth flour), sama ke chawal ka atta (barnyard millet flour) and sabudana flour.


Singhare ki poori can be made in two ways : plain just using  water chestnut flour or in combination with mashed potatoes.

We have used boiled mashed potatoes so the pooris have to be fried in hot oil. If fried on a lower temperature the potatoes absorb a lot of oil and the pooris become soggy.
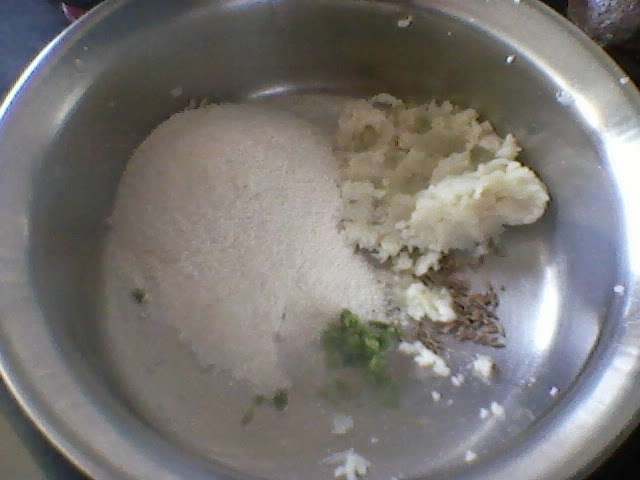

Ingredients

1 cups singhare ka atta/water chestnut flour
1 medium sized potatoes about 1 cup of mashed potatoes
1 or 2 green chilies, minced or finely crushed
1 tsp cumin powder or coarsely crushed cumin
2 tsp oil
rock salt or sendha namak as required
water  as required


Method
1   Mix all the mentioned ingredients thoroughly (except oil) in Singhara flour.


2   Since Singhara flour is not like the normal wheat flour, you need not add too much of water while kneading it.

3.  After kneading the flour well, take small portion of the flour and make it into a small kneaded ball, in your palm. Then, shape the kneaded ball it into a puri.


4         Heat oil in a frying pan and fry poori, until it becomes dark brown in color.


5  Drain excess oil on a tissue paper.  Repeat the above step with the rest of the flour mixture.


6  Serve poori with vratwale aloo or peanut chutney.


Saturday 13 September 2014

Anarsa | Anarse - Anarase recipe | diwali faral


The festival of lights is here.Diwali means Faral (treats or delicacies ).

Anarsa is one of my most favourite snacks for Diwali.One of my mausi makes the best anarase i have ever tasted . This recipe needs preparation in advance.

Making anarse is a compliacted task & will come perfect with practice.But is worth the effort.Only a sugran (master chef) can make a perfect anarse.

Perfect anarsa is one which has a jali ( mesh like) look  & crisp .


Ingredients

1 cups rice
1 cups powdered sugar or jaggery (grated)
1/4 cup milk
1 spoon ghee (tup)
Khuskhus (poppy seeds) as required
1 small banana
Ghee or oil for frying


Method:

1.Wash and soak rice for 3 days, changing water each day.
2.Wash and drain water, dry on a thick soft cloth, till dry.
3.Grind into powder and sieve it through fine mesh(chalan)
4.Add grated jaggery or sugar to powdered rice,ghee ,smashed banana . Add some milk if the mixture is too dry.
5.If possible pound this dough till it get little bit smooth.
6.Press dough tightly, keep closed in an airtight container  for 6-8 days.dont keep in fridge.
7.After 6-8  days again knead the dough till it get smooth, stiff. If required sprinkle little milk & knead again.
8.Divide dough into small balls  and cover them  with a moist clean cloth.
9.Use a clean plastic sheet.Sprinkle some poppy seeds on it.
10. Press small dough lightly on poppy seeds. Flatten the dough into a round.you can even place another plastic sheet greased with ghee on top of ball & roll it with rolling pin .
11. Meanwhile heat ghee or oil in a kadhai. Fry anarsa in ghee/ oil with poppy seeds side up or else they can get burnt . Be careful while frying slid the anarsa with help of a jhara ( spoon with holes which we use for frying pakora) in oil & the splash oil with another spoon so that it doesnt break . Shallowfry till golden on low-medium heat.

12.Drain keep aside to cool. Add more ghee to pan as required.
13 .Store in airtight container after completely cooled and crisp.


Tip :

1.At time of frying if anarsa breaks in oil then keep the dough back in airtight container for 1 more week & try again.this dough has shelf life of 2-3 months .

Friday 5 September 2014

Mumbai Mysore Masala Recipe


Me and hubby are both dosa fans .So dosa has an appearance in my kitchen atleast thrice a month & i love to experiment with dosa varieties


If you are an dosa lover check out dosa varieties here

Tried mumbai version of mysore masala dosa last weekend from tarla dalal site& yes we had a filling healthy & tasty saturday dinner

What is the difference between a regular Mysore Masala Dosa and the Mumbai style Masala Dosa.?

In Mysore Masala Dosa, a spicy garlic chutney is smeared on dosa and is stuffed with potato masala where as additional vegetables with spices like Pav bhaji masala or garam masala adds a zing to Mumbai style Mysore Masala Dosa.


Ingredients
2 cups dosa batter
6 tbsp butter
4 tbsp chopped onions
4 tbsp shredded cabbage
1 cup chopped tomatoes
4 tbsp chopped capsicum
2 tbsp grated carrot
2 tbsp grated beetroot
4 tsp finely chopped coriander (dhania)
1 cup dosa masala
8 tsp mysore chutney
8 tsp green garlic chutney
2 tsp chilli powder
2 tsp garam masala
salt to taste

For Serving
coconut chutney

sambhar


Method

1.Heat the butter in a deep kadhai, add the onions and saute on a medium flame for 1 minute.
2. Add the cabbage, tomatoes, capsicum,carrots, beetroot, coriander, chilli powder, garam masala and salt, mix well and cook on a medium flame for 2 to 3 minutes, while stirring occasionally.Remove from the flame and keep aside.


3.Heat a tava /non-stick tava (griddle), sprinkle a little water on it (it should sizzle immediately) and wipe off using a piece of cloth.

4. Pour ¼ th of the batter on the tava (griddle) and spread in a circular motion to make a 225 mm. (9") thin dosa.Add 1/2 tsp of butter and allow it to cook for 30 seconds.


5. Add 1/4 cup of dosa masala,2 tsp of mysore chutney, 2 tsp of green garlic chutney and 1/4 cup prepared masala and mix lightly and allow to cook for atleast 3 to 4 minutes or till the dosa is crispy.


6. Fold over while pressing it lightly using spatula to make a flat roll and cut into 4 equal pieces using sharp edge of the spatula on the tava (griddle).


7. Place the pieces on a plate and serve immediately with coconut chutney, green garlic chutney and sambhar.

Wednesday 3 September 2014

Idli recipe using idli rice urad dal| Dosa idli batter for soft idli crisp dosa


Idli is the most common breakfast in many Indian houses.I have already posted a version of Idli recipe using Idli rawa which i learnt in hyderabad.

Idli is the most common breakfast in many south Indian homes,though I do not make it on a daily basis, I do prepare it at least once in two weeks.I have already posted a version of Idli recipe using Idli rawa which is the usual way in which it is prepared in Andhra.
todays version is idli made using urad dal and idli rice (though i used regular sona masoori rice)
The best part of this one was that you can use it as an idli/dosa batter to make soft fluffy idlis and crispy dosas from the same batter
so its a two in one magic dosa idli batter


Ingredients:

4 cups Idli rice( I Had used regular sona masoori rice)
1 cup split Urad dal
3/4 cup Poha(beaten rice /atukulu)
1/2 tsp Fenugreek seeds
Salt to taste

Method:

1.Wash and soak rice and poha together in a pan in enough water for 5-6 hours.
2.Wash and soak urad daal,methi dana together in enough water for 5-6 hours.*
3.After 6 hours Grind .it to a very smooth paste (Do not add too much water, just add as much as needed). Touch the batter and no pieces of dal should be felt. The more it is ground, the better. Once it is ground very soft, some bubbles can be found on the surface, the more the bubbles, the better is the batter4.
4.Grind rice mixture to make a soft and smooth paste
5.Remove the rice batter and mix the mixture with the ground urad dal and add enough salt to it and mix well with your hand.,the batter should be thicker(not very thick as well and not thin)
6.cover batter with a lid and Keep the batter in a warm place overnight(say 8-12 hours). I keep it on warm gas stove, after all the cooking has been finished.
Check in the morning if the batter is fermented. The volume would have increased.
7 Grease the idli stand with oil .pour 1 laddle of batter to individual moulds .Steam them for around 10-12 mins (if using cooker, do not use the whistle add 2 glass of water to cooker). 
8 Leave it for around 5 mins before opening the steamer/cooker (or else, the steam falls on idlis and make them mushy).

9.With a wet spoon cleanly remove the idlis.


Tips
1.You can use the same batter for making thin crisp dosas.Add enough water to make the batter little thin and then spread the dosa as thin as possible.
2.Add a little cooked rice (say 1-2 tbsps) while grinding urad dal (once the urad dal is ground finely)in order to make the idlis softer & fluffier
3.Once batter is fermented do no stir batter much as this will make the batter loose its air bubbles and the idlis can turn hard.
4.Addition of poha is optional but it gives you very soft and fluffy idlis.You can even use a handful of sago instead of poha for the same.
5.Proper fermentation of minimum 8-10 hours is very important to get soft idlis but in winter it may need much more time .If living in cold places you can even place the batter in a preheated oven and turn the oven light ON.
6.idlis might not be soft if you make them after 3-4 days using the same batter,in that case  add a pinch of cooking soda mixed with 2 tbsp water into the batter and mix it well and make idlis.
7.You can easily store the leftover batter in the refrigerator for 4-5 days.
8 can even use normal rice if you dont have idli rice or can use 2 cup idli rice & 2 cup normal 
rice